The primary cause of first-day off-road failures isn’t a lack of expensive gear, but a critical failure in preparation, risk assessment, and legal diligence.
- True vehicle capability stems from specific preparation (tyres, recovery points, ground clearance), not the badge on the grille.
- Knowing the precise legal status of a UK Green Lane *before* you drive it is as crucial as having a full tank of fuel.
Recommendation: Shift your focus from simply buying recovery gear to building a ‘prevention mindset’ that actively stops you from getting stuck in the first place.
The glossy photos and epic YouTube videos paint a romantic picture of UK off-roading: a capable 4×4, a muddy trail, and glorious countryside views. Yet, the stark reality for many first-timers is a call to a recovery service before the first 24 hours are up. The lure of adventure often overshadows the cold, hard physics of traction and the complex legalities of British byways. Many enthusiasts believe the solution lies in a bigger winch or a more expensive vehicle, throwing money at a problem that money alone cannot solve.
This approach misses the fundamental point. While equipment is important, the true divide between a successful expedition and a frustrating recovery situation is not the size of your budget, but the depth of your preparation. It’s about understanding the crucial difference between a showroom SUV and a genuinely trail-ready machine, knowing what gear actually prevents a £500 call-out fee, and navigating the legal maze of where you can and cannot legally drive.
But what if the most powerful tool in your off-road arsenal wasn’t made of steel, but was a ‘prevention mindset’? This guide is built on that principle. We will deconstruct the common failure points of off-road trips and provide a framework for risk assessment and meticulous preparation. We’ll explore why a standard vehicle fails, how to build a smart recovery kit, the legal landscape of UK trails, and how to read the terrain to avoid disaster. This is your roadmap to becoming a self-reliant and responsible off-roader, not just another recovery statistic.
This article provides a comprehensive framework to ensure your first serious off-road expedition is memorable for the right reasons. Below is a summary of the key areas we will cover to help you prepare effectively.
Summary: The Expedition-Ready Framework: A Guide to Successful UK Off-roading
- Why Your Standard SUV Cannot Handle What a Properly Prepared Defender Can?
- How to Build a £300 Recovery Kit That Prevents £500 Call-Out Fees?
- Green Lanes, Pay-and-Play Sites, or Private Land: Which UK Off-Road Options Are Actually Legal?
- The 4 Ground Conditions That Transform Fun Off-Roading Into Dangerous Stuck Situations
- How Much Water, Fuel, and Food for a 3-Day Welsh Green Lane Expedition?
- Snow, Mud, or Gravel: When Should You Actually Turn Off Traction Control?
- 12V Cigarette Lighter or Rechargeable Battery: Which Inflator Works When Your Car Won’t Start?
- Why Does Your Cheap Tyre Inflator Take 15 Minutes to Add 5 PSI?
Why Your Standard SUV Cannot Handle What a Properly Prepared Defender Can?
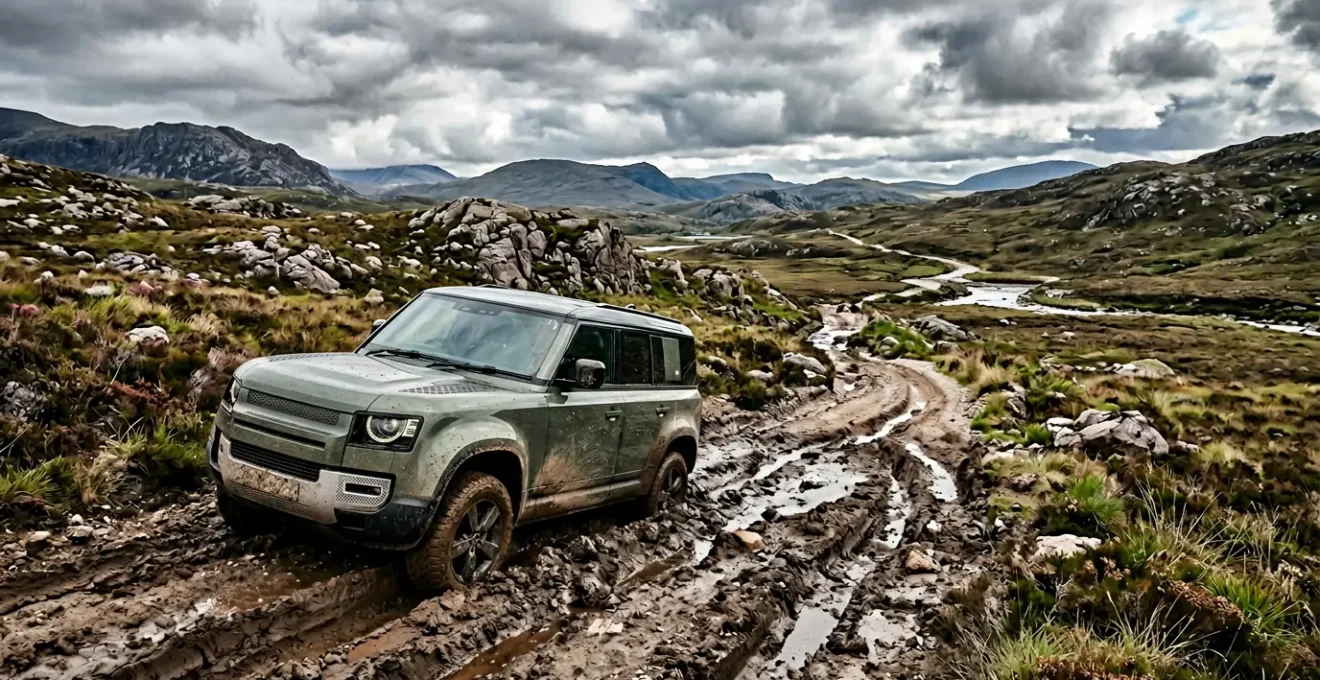
It’s a common misconception that a vehicle’s off-road prowess is determined by the badge on its bonnet. The truth is far more nuanced. A brand-new, high-spec SUV, even one with a famed off-road name, is often a compromise. It’s engineered primarily for on-road comfort and safety, with electronic systems designed to simulate off-road capability. A « properly prepared » vehicle, regardless of its base model, prioritises mechanical resilience and suitability for purpose over showroom appeal.
The core differences lie in a few critical areas: tyres, ground clearance, and recovery points. A standard SUV comes with road-biased tyres that instantly clog with mud, becoming useless slicks. A prepared vehicle has All-Terrain or Mud-Terrain tyres with deep, self-cleaning treads. A standard SUV has suspension tuned for speed bumps, not for articulating over rocks or ruts, leading to a loss of traction and potential underbody damage. A prepared vehicle often has a modest suspension lift and more robust components. Crucially, a standard SUV may lack rated recovery points bolted directly to the chassis, making any recovery attempt dangerous and likely to cause damage.
Case Study: Electronic Aids vs. Mechanical Capability
To understand this, consider a comprehensive off-road test conducted by Edmunds. They pitted a Land Rover Defender against a Jeep Wrangler and a Toyota 4Runner. While the Defender was the most comfortable, it relied heavily on its sophisticated ‘Terrain Response’ electronic systems to find grip. In contrast, the Wrangler, with its simpler but more focused mechanical systems like a disconnectable front stabiliser bar, demonstrated superior raw capability straight from the factory. This highlights a key principle: electronic aids can be a fantastic supplement, but they are no substitute for fundamental mechanical advantages like good articulation and robust engineering. A prepared vehicle enhances these mechanical fundamentals, while a standard SUV often tries to mask their absence with software.
This isn’t about one brand being better than another. It’s about understanding that « prepared » means the owner has deliberately addressed the vehicle’s weak points for the specific challenges of off-roading. It’s a shift from relying on a manufacturer’s marketing to taking personal responsibility for the vehicle’s genuine field-readiness. True capability is built in the workshop, not bought in the showroom.
How to Build a £300 Recovery Kit That Prevents £500 Call-Out Fees?
The best recovery is the one you never have to perform. But when prevention fails, a well-thought-out recovery kit is the difference between a minor delay and a day-ending, wallet-emptying call for professional help. A smart kit isn’t about having the biggest winch; it’s about an escalation ladder of options, starting with the simplest, lowest-risk solution first. For around £300, you can assemble a core kit that handles the vast majority of situations a solo vehicle or small convoy will face.
The first level of your kit addresses the most common problem: loss of traction. This isn’t a kinetic pull; it’s about helping the vehicle help itself. A tyre deflator and a reliable portable compressor are non-negotiable. Lowering tyre pressure drastically increases the tyre’s footprint, often providing enough grip to drive out of a slippery situation. If that fails, a set of quality recovery boards provides a high-traction surface to get you moving. These three items alone will solve over half of all stuck scenarios.
Only when traction aids fail should you escalate to a kinetic recovery. This is where a rated kinetic rope and two soft shackles come in. Unlike a simple tow strap, a kinetic rope stretches and stores energy, delivering a smoother, more effective pull that is far less stressful on both vehicles’ recovery points. Finally, for static pulls or winching support, a tree saver strap and a D-ring shackle are essential for creating safe anchor points. Every piece of this kit should be rated for your vehicle’s Gross Vehicle Mass (GVM).

This tiered approach, often called the « Recovery Escalation Ladder, » is a core principle of safe off-roading. It forces a methodical, low-impact approach. Below is a breakdown of the essential components and their approximate costs.
- Level 1 – Increase Traction: Tyre deflator kit (£15-30), portable air compressor (£50-100), recovery boards/traction mats (£80-150)
- Level 2 – Kinetic Assistance: Rated kinetic recovery rope 7/8″ x 20ft (£40-60), two soft shackles rated for vehicle weight (£30-50 each)
- Level 3 – Static Pull & Safety: Tree saver strap (£20-35), rated D-ring shackles (£15-25), heavy-duty gloves (£15-25), and a sturdy shovel (£20-40)
Green Lanes, Pay-and-Play Sites, or Private Land: Which UK Off-Road Options Are Actually Legal?
In the UK, the question « Can I drive here? » is fraught with complexity. Unlike countries with vast public lands, British off-roading is governed by a patchwork of ancient rights of way and modern legislation. A wrong turn can land you with a fine, a criminal record, and damage the reputation of the entire recreational 4×4 community. Understanding the legal landscape is not optional; it is a fundamental responsibility of every driver. Your options generally fall into three categories: public rights of way (Green Lanes), commercial sites, and private land.
Green Laning refers to driving on the network of public byways. The most important designation to know is ‘Byway Open to All Traffic’ (BOAT). These are, in theory, legal to drive with any road-legal vehicle. However, their status can be affected by temporary or permanent Traffic Regulation Orders (TROs), which councils use to restrict access for repair or conservation. Driving an ‘Unclassified County Road’ (UCR) can be even more ambiguous, as vehicular rights may not be proven. Assuming a green lane is legal just because it looks like a track is a recipe for disaster. Legal diligence is mandatory.
For guaranteed legal access and more challenging terrain, Pay-and-Play sites are an excellent option. These are privately owned venues that offer purpose-built off-road courses for a daily fee. They provide a safe, controlled environment to test your vehicle and skills without any legal ambiguity. The third option, driving on private land, requires the explicit, direct permission of the landowner. Without it, you are trespassing.
The following table, based on official classifications, breaks down the main types of routes you will encounter on maps and what they mean for you as a driver. It’s essential to familiarise yourself with these before planning any trip.
| Route Type | Legal Vehicle Access | How to Identify | Key Restrictions |
|---|---|---|---|
| Byway Open to All Traffic (BOAT) | Yes – All vehicles permitted | Green crossed line on OS maps | Subject to TROs; must be road-legal vehicle |
| Unclassified County Road (UCR/ORPA) | Possible – Rights often unproven | Check Council ‘List of Streets’ | Verify with County Council; may have restrictions |
| Restricted Byway | No – Motor vehicles prohibited | Purple dashed line on OS maps | Pedestrians, horses, cycles only (post-NERC Act 2006) |
| Bridleway | No – Motor vehicles prohibited | Red dashed line on OS maps | Pedestrians, horses, cycles only |
| Footpath | No – Motor vehicles prohibited | Red dotted line on OS maps | Pedestrians only |
| Pay-and-Play Sites | Yes – Private land permission | Commercial off-road venues | Varies by site; booking required |
Action Plan: Your Pre-Drive Legality Workflow
- Initial Route Planning: Use Ordnance Survey maps to identify potential routes marked as ‘Byway Open to All Traffic’ (BOAT).
- Cross-Reference with Authority: Access the GLASS (Green Lane Association) TrailWise2 database to check for the latest route status and any temporary Traffic Regulation Orders (TROs).
- Verify Definitive Map: For absolute certainty, check the relevant County Council’s Definitive Map, the ultimate legal record of rights of way.
- Final TRO Check: Review the County Council’s website for any last-minute TROs that may have been put in place due to weather or events.
- Assess Ground Conditions: Review recent user reports. Is the route passable without causing undue damage? If it’s a quagmire, the responsible choice is to find another route.
The 4 Ground Conditions That Transform Fun Off-Roading Into Dangerous Stuck Situations
Beyond the legalities and mechanical preparations lies the most dynamic variable: the ground itself. In the UK, with its famously fickle weather, a dry and easy trail can become a treacherous bog in a matter of hours. Developing situational awareness—the ability to read the terrain ahead and anticipate how your vehicle will interact with it—is the highest form of the prevention mindset. Four specific ground conditions are notorious for catching out the unprepared.
First is deceptive mud. Not all mud is equal. A thin surface layer might be fine, but hidden beneath could be deep, sticky clay that offers zero traction and instantly overloads your tyres. Second is the off-camber slope, especially when wet. Here, gravity becomes your enemy, pulling the vehicle sideways. A slide can be uncontrollable and lead to a rollover, one of the most dangerous off-road scenarios. Third, deep ruts can be deceptive. While they guide you, they can also become a trap, lifting wheels off the ground and high-centring the vehicle on its differential, leaving you completely immobilised.
Finally, and perhaps most perilously, are water crossings. A simple-looking ford can hide a soft, silty bottom, powerful currents, or depths exceeding your vehicle’s wading limit. Driving into an unknown water crossing is one of the quickest ways to destroy an engine through hydrostatic lock. The rule is simple: if you don’t know for certain what’s under the water, you don’t drive through it. You get out, and you check it on foot first.
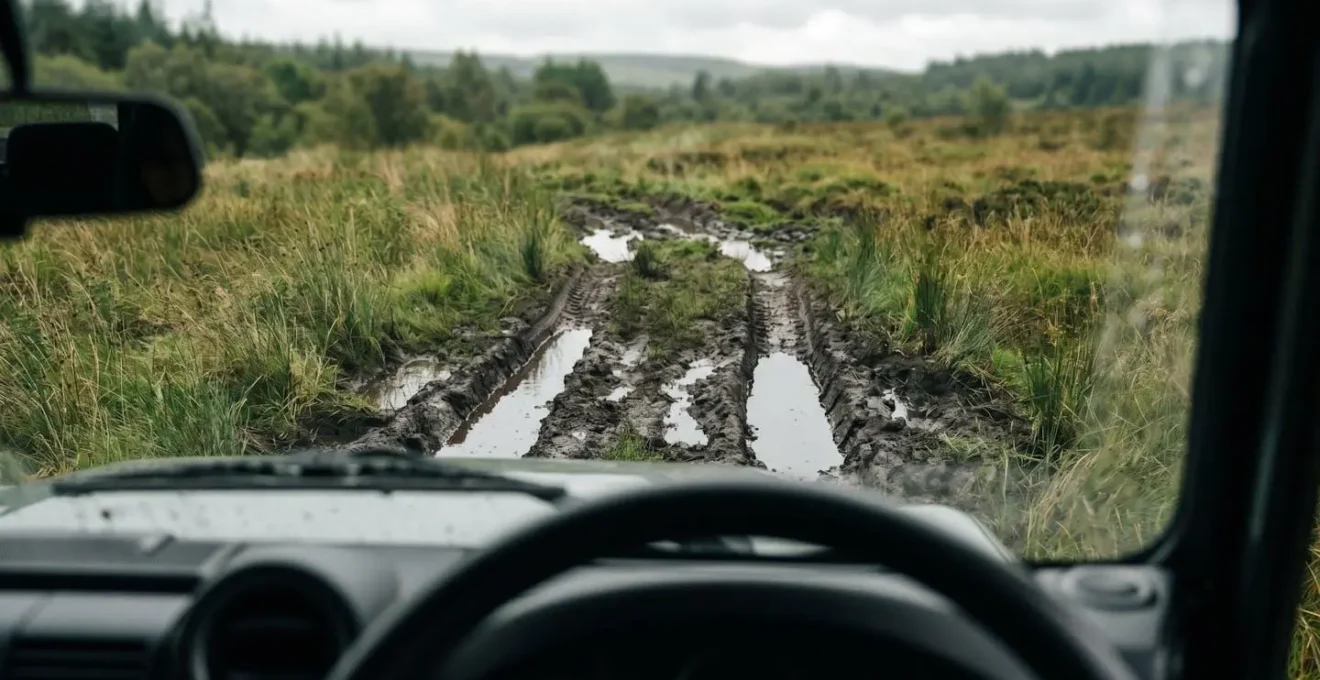
Reading these conditions is a skill developed over time, but it starts with a healthy dose of caution and a structured way of making decisions. For water crossings, a formal go/no-go checklist is not just good practice, it’s a potential engine-saver.
Checklist: Go/No-Go for Water Crossings
- Visual Assessment: Can you see the bottom clearly all the way across? If the water is murky or opaque, the default answer is NO.
- Physical Depth Check: Have you physically waded the crossing to find the deepest point? Is this depth safely below your vehicle’s certified wading depth? (If no, it’s a No-Go).
- Flow Speed Assessment: Is the water flowing faster than a walking pace? A strong current can push a 2-tonne vehicle off its line. (If yes, it’s a No-Go).
- Entry/Exit Point Inspection: Have you walked both the entry and exit banks? Are they firm ground, or a muddy bog waiting to trap you? Are the angles too steep?
- Bed Condition Analysis: As you waded, was the bottom firm gravel or rock, or was it soft, deep silt or mud? (Soft bottom is a high-risk No-Go).
How Much Water, Fuel, and Food for a 3-Day Welsh Green Lane Expedition?
Logistics are the unglamorous backbone of any successful expedition. For a three-day trip exploring the green lanes of Wales, your calculations for water, fuel, and food must include a significant safety margin. The goal is self-sufficiency, not just for the planned duration, but for an extra 24 hours in case of unforeseen delays like a blocked trail, mechanical issue, or simply getting lost.
For water, the standard rule is a minimum of 5 litres per person, per day. This covers drinking as well as basic cooking and hygiene. For two people over three days, that’s 30 litres, plus a 10-litre reserve for your emergency fourth day. It’s heavy, but it’s a non-negotiable safety item. Store it in multiple, robust containers to avoid losing your entire supply from a single leak.
Fuel calculation is more complex. Do not use your vehicle’s on-road MPG figure. When driving off-road in low-range gears, fuel consumption can easily double or even triple. A safe method is to calculate your maximum on-road range on a full tank, and then halve it to get a conservative off-road range. Plan your route between fuel stations based on this lower figure. For a multi-day trip in a remote area like parts of Wales, carrying an extra 20-litre jerry can of fuel is a wise and common practice.
Food should be simple, high-energy, and require minimal cooking. Plan for three days of main meals (breakfast, lunch, dinner) plus snacks. Then, pack a complete, separate 24-hour emergency food supply that requires no cooking at all—think energy bars, trail mix, and jerky. This is your lifeline if you are stuck without the ability to cook. Remember to pack out everything you pack in, including all food wrappers, to leave the trail as you found it.
Snow, Mud, or Gravel: When Should You Actually Turn Off Traction Control?
Modern 4x4s are packed with sophisticated electronic driver aids, with traction control (TC) being the most common. In most on-road scenarios, it’s a brilliant safety system, preventing wheel spin and maintaining stability. However, off-road, leaving it on can be the very thing that gets you stuck. Understanding when to trust the computer and when to take full control is a key element of developing mechanical sympathy and driver skill.
Traction control works by detecting a spinning wheel and applying the brake to it, attempting to redirect power to the wheels that have grip. On a high-traction surface like a gravel road or uneven dry dirt, this is perfect. It manages momentary slips and keeps the vehicle stable. However, in deep mud, soft sand, or deep snow, you need the opposite. In these conditions, controlled wheel spin is essential. It helps to clear the mud from the tyre treads, maintaining their biting edges, and it allows the vehicle to maintain forward momentum. If TC is left on, it will constantly cut power and apply the brakes as the wheels spin, bogging the vehicle down until it comes to a complete halt.
This is why most capable 4x4s have a button to disable traction control, or a specific « Mud/Sand » mode that does it for you. Disabling TC gives control back to the driver, requiring more skill in throttle modulation but allowing the vehicle to use momentum to get through low-traction obstacles. Fully disabling all aids, including Electronic Stability Control (ESC), is typically reserved for very advanced techniques or recovery situations where precise, uninterrupted wheel control is needed. For 90% of off-roading, a simple TC ‘off’ or ‘mud mode’ is the correct choice for low-grip surfaces.
The decision to enable or disable electronic aids depends entirely on the terrain and the desired vehicle behaviour. This table provides a clear guide for when to use each setting.
| Mode Setting | Terrain Type | Why This Setting | Risk Level |
|---|---|---|---|
| TC ON (Full Traction Control Active) | High-traction uneven surfaces: Gravel trails, rocky terrain, dry dirt roads | Prevents sudden wheel slip on loose but firm surfaces; maintains vehicle stability when individual wheels lose grip momentarily | Low – Recommended for most conditions |
| TC OFF or Mud/Sand Mode (TC Disabled, ESC May Remain Active) | Low-traction momentum-based surfaces: Deep mud, soft sand, deep snow, steep muddy inclines | Allows controlled wheel spin necessary to clear tread and maintain forward momentum; prevents power-cutting that causes vehicles to bog down | Medium – Requires throttle control skill |
| TC FULLY OFF + ESC Disabled (All Electronic Aids Off) | Advanced recovery situations only: Extreme rock crawling, precise wheel placement, specific recovery techniques | Gives driver complete control without electronic intervention; necessary for techniques requiring individual wheel spin or specific vehicle positioning | High – Advanced drivers only; significantly increased rollover risk |
12V Cigarette Lighter or Rechargeable Battery: Which Inflator Works When Your Car Won’t Start?
Airing down your tyres is a fundamental off-road technique, which makes a reliable method for airing them back up an absolute necessity. A portable tyre inflator is a key piece of kit, but not all are created equal, especially when things go wrong. Your choice of power source can be the difference between getting back on the road and being stranded. The critical question to ask is: what happens if my vehicle’s battery is dead?
The most common and cheapest inflators plug into your vehicle’s 12V cigarette lighter socket. While convenient, this is the least reliable method. These sockets are often on low-amperage fuses (10A or 15A) that high-draw compressors can easily blow. More importantly, they require the vehicle’s ignition to be on, making them useless if you have a flat battery—a very real possibility after a long day of winching or running accessories.
A significant step up are compressors that connect directly to the battery terminals with alligator clamps. These models can draw more power, resulting in much faster inflation times. They bypass the vehicle’s delicate internal wiring and fuses, making them far more robust. However, they still depend entirely on a healthy vehicle battery to operate.
The ultimate safety net is an inflator with its own integrated rechargeable battery. These lithium-ion powered units are completely independent of the vehicle’s electrical system. If your car won’t start, you can still inflate your tyres to road pressure, which could be essential for getting a tow or making it possible for a recovery vehicle to reach you. While their finite charge may limit them from inflating four large tyres from very low pressures in one go, their ability to function in a « dead car » scenario makes them an invaluable part of a comprehensive recovery kit.
The power source of your tyre inflator directly impacts its reliability in an emergency. This hierarchy shows how each type performs under different conditions.
| Power Source Type | Works With Dead Battery? | Typical Flow Rate | Best Use Case | Key Weakness |
|---|---|---|---|---|
| Direct-to-Battery Clamps (12V Hardwired) | No – Requires functioning vehicle battery | High (25-35 LPM) | Re-inflating multiple large tyres (35″) from low pressure; professional/frequent use | Vehicle battery dependent; requires hood access |
| Integrated Rechargeable Battery (Lithium-Ion) | Yes – Completely independent | Medium (15-25 LPM) | Trail-side pressure adjustments; emergency backup when vehicle won’t start | Finite charge capacity; may not complete 4 tyres from very low pressure |
| 12V Cigarette Lighter Plug | No – Requires vehicle electrical system | Low-Medium (12-20 LPM) | Convenience topping-up; casual use | Often blows vehicle’s 10A/15A fuse; dependent on ignition being on; weakest reliability |
Key Takeaways
- True off-road capability is built through preparation (tyres, recovery points), not bought off the showroom floor.
- A smart, sub-£300 recovery kit focused on traction aids and a kinetic rope solves most problems and prevents expensive call-outs.
- Legal diligence is non-negotiable in the UK; always verify a trail’s status (BOAT, TROs) before driving.
- The ‘prevention mindset’ means actively reading terrain, especially mud, off-camber slopes, and water crossings, to avoid getting stuck.
Why Does Your Cheap Tyre Inflator Take 15 Minutes to Add 5 PSI?
The frustration is familiar to many: you’re cold, wet, and ready to head home, but you’re stuck watching a screaming, cheap tyre inflator take an eternity to add a few PSI. The massive price difference between a £30 inflator and a £200 model isn’t just branding; it’s a direct reflection of performance, longevity, and the physics of moving air. Understanding why your cheap inflator is so slow is the key to justifying an investment in quality gear.
The first metric to ignore is the advertised maximum pressure (e.g., « 150 PSI! »). This is a largely meaningless marketing number. The specification that truly matters is the flow rate, measured in Cubic Feet per Minute (CFM) or Litres Per Minute (LPM). This tells you how much air volume the compressor can actually move. A cheap inflator might have a flow rate of 12-15 LPM, while a quality unit can exceed 35 LPM. This is the difference between waiting 15 minutes per tyre and waiting 3 minutes.
The second critical factor is the duty cycle. This is the amount of time the compressor can run before it needs to cool down to prevent permanent damage. A cheap unit might have a 10% duty cycle, meaning for every minute of work, it needs nine minutes of rest. A quality compressor designed for large off-road tyres will have a 50% or even 100% duty cycle, allowing for continuous operation. This is achieved through better internal components—metal pistons instead of plastic, larger motors, and integrated cooling fans. This is where the cost difference lies, and it’s what separates a convenient gadget from a genuine expedition tool.
Checklist: Understanding Inflator Performance
- Check the Flow Rate: Ignore the PSI rating. Look for the CFM or LPM specification. For off-road tyres, anything below 25 LPM will feel slow.
- Verify the Duty Cycle: A 10% duty cycle is for emergencies only. A 50-100% duty cycle is required for airing up multiple large tyres without overheating.
- Analyse Cost-Per-Minute: A £30 inflator taking 60 minutes for four tyres costs you nearly an hour of your time. A £200 unit doing the job in 12 minutes buys you back 48 minutes. What is your time worth?
- Compare Internal Components: Budget models use plastic pistons and small motors that overheat. Quality units use metal pistons, larger motors, and active cooling.
- Consider a Real-World Test: Can the inflator take a 35-inch tyre from a trail pressure of 15 PSI back to a road pressure of 35 PSI without needing a rest? This is the true test of an off-road compressor.
Ultimately, a successful off-road expedition hinges on this philosophy of informed preparation. By shifting your focus from reactive recovery to proactive prevention, you transform from a passenger of fate into the master of your adventure. This mindset—applied to your vehicle, your gear, and your route planning—is what truly separates the seasoned explorer from the first-day recovery statistic. Apply these principles to your next plan and discover the confidence that comes from genuine self-reliance.