The MOT brake test isn’t about how new your parts are; it’s about detecting the systemic imbalances and hidden corrosion that lead to a fail certificate.
- Failures are often caused by uneven wear across an axle (imbalance > 30%) and corrosion on unseen inner disc faces, not just low pads.
- Brake fluid moisture content is a silent failure point, drastically reducing stopping power long before the fluid level drops.
Recommendation: Shift from last-minute checks to a proactive 6-week pre-MOT inspection window to diagnose and fix these hidden issues affordably.
It’s a figure that should concern every UK driver: brake defects are a leading cause of MOT failures, with some reports suggesting they contribute to as many as 12% of all rejections. Every year, thousands of vehicle owners are caught out, facing the inconvenience and expense of a re-test. Most drivers believe a quick look at the brake pads or a check of the fluid reservoir is enough to get a pass. They focus on the visible and the obvious, assuming that if the car seems to stop fine, it must be safe.
This is a fundamental misunderstanding of what an MOT inspection entails. A tester isn’t just looking for worn-out parts; they are conducting a systematic evaluation of the entire braking system’s integrity and performance under load. The real reasons for failure often lie hidden from a casual inspection. They are found in the subtle differences in braking force between two wheels, the advanced corrosion on an inner brake disc, or the degraded quality of the fluid itself.
But what if the key to passing wasn’t just replacing parts, but adopting the diagnostic thinking of a certified technician? This guide moves beyond the generic checklists. We will break down the specific failure points an MOT tester is trained to find, from component wear to systemic imbalances. You will learn not only what fails, but precisely why it fails and how to identify these safety-critical issues yourself, long before you hand over your keys at the test centre.
By understanding the system as a whole, you can shift from a reactive, last-minute panic to a proactive strategy that ensures your vehicle isn’t just road-legal, but genuinely safe for you and your passengers. This article will walk you through the critical checks, the meaning behind the symptoms, and the strategic timing that separates a confident pass from an unexpected fail.
Contents: Why Brake Defects Are a Top Reason for MOT Failures
- Which 5 Brake Components Cause the Most MOT Failures in UK Vehicles?
- How to Check Your Brake Pad Thickness Through the Alloy Wheel Spokes?
- Grinding, Squealing, or Rubbing: What Each Brake Noise Actually Indicates?
- The Single-Side Brake Job That Creates Dangerous Pulling Under Emergency Braking
- When to Test Brake Fluid Moisture Content: The Pre-MOT Window That Prevents Failures?
- When to Book Your Service: The 6-Week Window That Maximises MOT Pass Rates?
- The Tyre Wear Pattern That Reveals You Have Been Running 10 PSI Low for Months
- Why Do Some Brake Pads Last 25,000 Miles While Others Fail at 8,000?
Which 5 Brake Components Cause the Most MOT Failures in UK Vehicles?
From a technician’s viewpoint, an MOT brake test is a search for evidence. We are looking for signs that the system can no longer perform its primary function safely and effectively. While drivers worry about single components, we assess the system’s overall health. The most common failures are not random; they follow a distinct pattern of wear, corrosion, and imbalance that compromise stopping power in a measurable way. These five areas are where the vast majority of brake-related MOT failures originate.
Understanding these specific failure points is the first step in pre-empting a fail certificate. They represent the difference between a simple advisory and a vehicle being deemed unroadworthy.
- Brake Pads: The most well-known wear item. A failure occurs when the friction material thickness is below 1.5mm. At this point, the pad’s ability to dissipate heat and provide consistent friction is critically compromised.
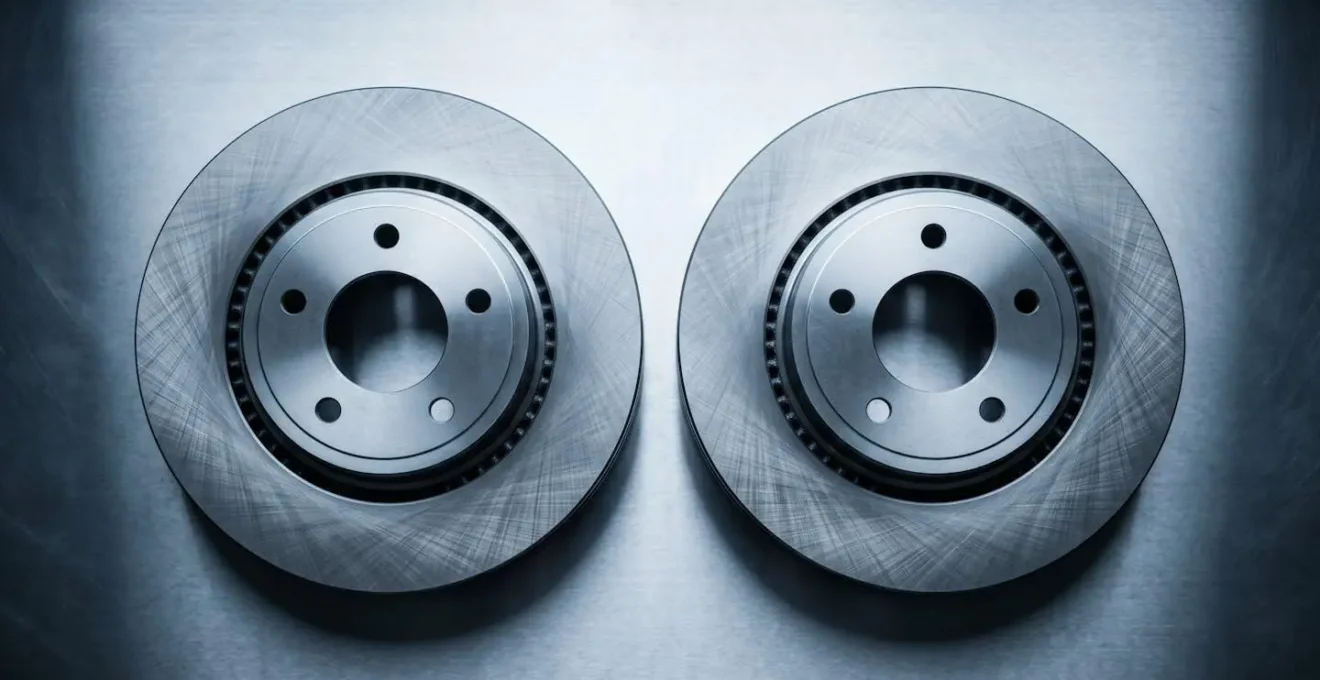
- Brake Discs: It’s not just about thickness. A disc will fail an MOT for significant pitting, scoring, or corrosion, especially on the inner face which is often hidden from view. This uneven surface dramatically reduces the contact area with the pad.
- Brake Imbalance: This is a critical failure that many drivers overlook. If the braking effort between the wheels on a single axle differs by more than 30%, it will fail. This can cause the vehicle to pull violently to one side during an emergency stop.
- Brake Fluid: A visible leak is an immediate and obvious fail. However, a low fluid level is also a major red flag, as it often indicates excessively worn pads that have caused the caliper pistons to extend further than they should.
- Parking Brake: The handbrake must be able to hold the vehicle stationary on a 16% gradient (a 1-in-6 slope). Reduced efficiency, often due to stretched cables or worn rear brake components, is a common failure point.
Each of these issues points to a degradation in the friction system’s integrity. They are not isolated problems but interconnected symptoms of a system under stress.
How to Check Your Brake Pad Thickness Through the Alloy Wheel Spokes?
One of the most empowering checks a driver can perform is a visual inspection of the brake pads. You don’t always need to remove the wheel to get a good indication of wear, especially on modern cars with open-spoke alloy wheels. This quick check can save you from a guaranteed MOT failure. The key is using modern technology—your smartphone—to get a clear, magnified view that the naked eye can’t achieve. This technique allows you to identify the two crucial parts of the brake pad: the dark friction material and the shiny metal backing plate it’s bonded to.
To perform this check effectively, you need good lighting and a methodical approach. The goal is to estimate the remaining thickness of the friction material and compare it to the MOT failure threshold of 1.5mm.
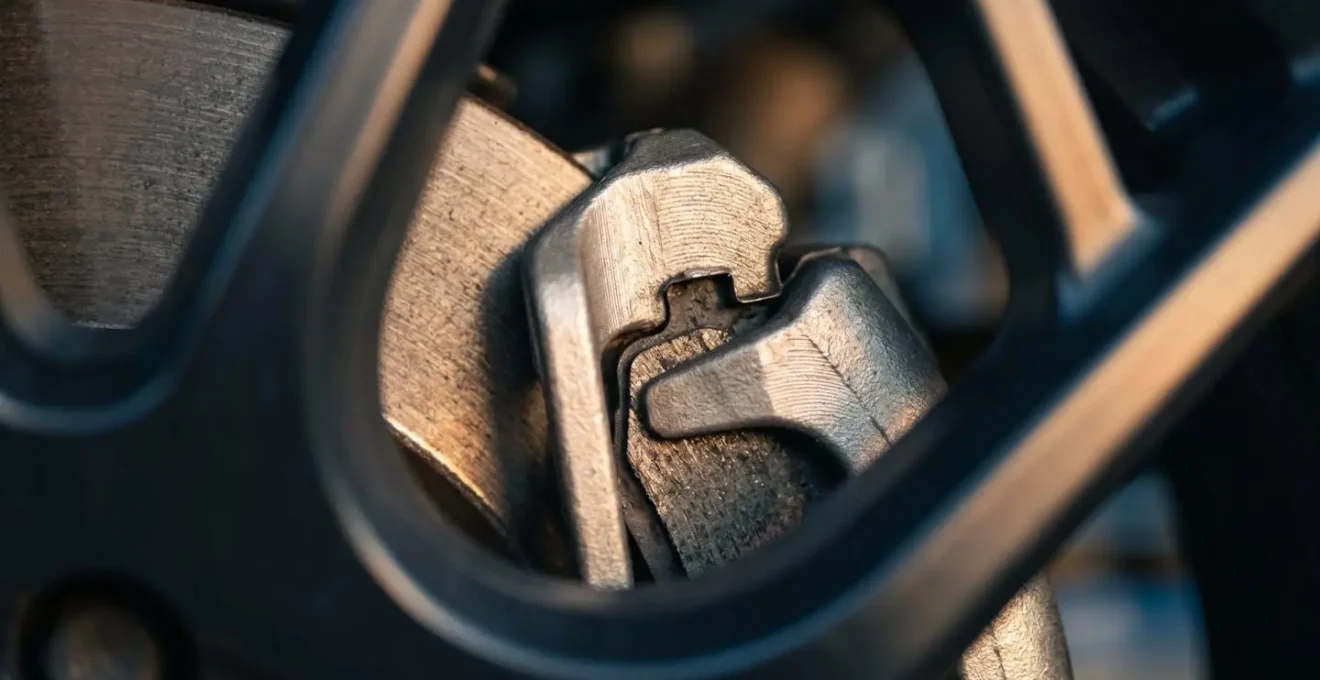
As seen in this close-up, the friction material is the darker, coarser layer that makes contact with the disc. The shiny steel behind it is the backing plate. When the friction material is worn down to the plate, you get the catastrophic grinding noise indicating metal-on-metal contact. Before that, a small metal tab called a wear indicator will make contact with the disc, causing a high-pitched squeal. Your job is to catch the wear long before either of these events occurs.
- Position the vehicle on level ground with the parking brake on. Turn the steering wheel to full lock to give you a better view of the front brake calipers.
- Use your smartphone’s flashlight to illuminate the brake caliper assembly through the spokes of the wheel.
- Activate your phone’s camera and use the zoom function (3x to 5x) to get a magnified view of the brake pad inside the caliper.
- Identify the outer pad first. Distinguish between the dark, thick friction material and the thinner, shiny metal backing plate.
- Crucially, make an effort to see the inner pad as well. It is often harder to see but can wear faster than the outer pad, giving you a more accurate assessment of the system’s true condition.
- As a rule of thumb, a 3mm thickness is about the width of two £1 coins stacked together. If you have less than this, it’s time to book a professional inspection.
Grinding, Squealing, or Rubbing: What Each Brake Noise Actually Indicates?
Brake noises are the system’s way of communicating. However, not all sounds are created equal. A driver who panics at a harmless morning squeak might ignore a critical grinding noise. From a diagnostic perspective, the type of noise, its timing, and the conditions under which it occurs are all crucial data points that point to a specific cause. Differentiating between these sounds is key to understanding the health and safety of your braking system. A high-frequency vibration is the root cause of most brake noise, but the source of that vibration is what determines the urgency of the required action.
A persistent, high-pitched squeal that occurs only when you apply the brakes is often the sound of the built-in wear indicator. This is a small spring-steel tab designed to contact the brake disc when the pad material reaches its minimum safe thickness. It is an intentional, engineered warning. In contrast, a deep, metallic grinding sound during braking is a critical emergency. It signifies that the friction material is completely gone, and the metal backing plate of the pad is grinding directly against the brake disc, causing massive damage and severely compromised stopping power.
The following table provides a diagnostic framework for interpreting the most common brake noises, their likely causes, and the necessary response.
| Noise Type | Timing/Condition | Most Likely Cause | Urgency Level | Action Required |
|---|---|---|---|---|
| High-pitched squeal when braking | Consistent during brake application | Wear indicator tab contacting rotor – pads nearing minimum thickness | Moderate | Schedule brake inspection within 1-2 weeks |
| Low groan or squeak | First stops on damp morning only | Harmless surface rust on rotor from overnight moisture | Low | None – dissipates with normal driving |
| Persistent squeal after recent brake job | New pads, continuous noise | Improper bedding-in or missing anti-vibration shims | Moderate | Return to installer for correction |
| Deep metallic grinding | Loud, harsh during braking | Friction material completely worn – metal backing plate contacting rotor | Critical | Immediate professional service – do not drive |
| Mechanical clunk | First brake application only | Worn caliper guide pins or loose mounting hardware | High | Professional inspection within days |
| Rhythmic whooshing | Synchronized with wheel rotation when braking | Warped brake disc creating uneven contact | High | Disc measurement and possible replacement |
The Single-Side Brake Job That Creates Dangerous Pulling Under Emergency Braking
One of the most dangerous and misguided cost-saving measures in vehicle maintenance is replacing brake pads or discs on only one side of an axle. From an MOT tester’s perspective, this is a recipe for failure. The braking system is designed for perfect symmetry. When you apply the brakes, you expect the car to slow down in a straight, stable line. This stability depends on the braking forces on the left and right wheels being almost identical. A single-side brake job completely destroys this critical balance.
As experts from Juratek Technical explain in their analysis of MOT failures, the consequences are severe:
Brake imbalance can significantly affect stopping stability, particularly under emergency braking. Even if components appear serviceable visually, imbalance can trigger a failure.
– Juratek Technical, Common Brake Failures During MOT in the UK
When one side has a new, efficient pad and disc, and the other has a half-worn, less effective set, the braking force becomes dangerously lopsided. Under light braking in town, you may not notice. But in an emergency braking situation on a motorway, the side with the new components will « bite » much harder. This creates a strong pulling force on the steering wheel, potentially sending the vehicle into an uncontrollable skid. This is precisely why an imbalance greater than 30% across an axle is an automatic MOT fail.
The principle is non-negotiable: brake components—both pads and discs—must always be replaced in axle pairs. This ensures that the friction characteristics, heat dissipation, and wear rates are perfectly matched on both sides. The visual symmetry of replacing parts in pairs directly translates to the dynamic symmetry and stability of the vehicle under braking. Attempting to save money by changing only one side is a false economy that compromises safety and guarantees a future MOT failure.
When to Test Brake Fluid Moisture Content: The Pre-MOT Window That Prevents Failures?
Brake fluid is one of the most neglected components in a vehicle, yet it is absolutely critical for safety. Most drivers assume that if the reservoir is full, the fluid is fine. This is a dangerous assumption. The most significant threat to brake fluid performance is not loss, but contamination—specifically, from moisture absorbed from the atmosphere. Brake fluid is hygroscopic, meaning it actively attracts and absorbs water. This moisture has a catastrophic effect on the fluid’s boiling point. An SAE study confirmed the speed of this degradation, finding that an average one-year-old car had 2% moisture content in its fluid.
When brake fluid with as little as 3% water content gets hot under heavy braking, that water can turn to steam. Steam is compressible, unlike fluid. This phenomenon, known as vapor lock, causes the brake pedal to feel spongy and go straight to the floor with little to no braking effect. While an MOT tester can’t easily test for this on the rollers, they will fail a vehicle if the fluid is visibly discoloured or low. The real danger, however, is the hidden loss of performance. Testing the moisture content is a simple, proactive step that can prevent a serious incident and ensure system integrity.
Your Action Plan: Pre-MOT Brake Fluid Moisture Test
- Prepare Vehicle: Park on a level surface with the handbrake engaged. Locate the brake fluid reservoir in the engine bay and wipe the cap and surrounding area clean before opening to prevent dirt from entering.
- Select Tester: Use a simple electronic brake fluid tester. These devices measure the fluid’s conductivity, which increases with moisture content, and display the result via LED lights.
- Test Procedure: Remove the reservoir cap and carefully insert the tester’s probes into the fluid. Do not let the probes touch the sides or bottom of the reservoir. Hold for 5-10 seconds until the reading is stable.
- Interpret Results: Green (under 1.5%) is good. Amber (1.5% – 3%) is an advisory, meaning a fluid change is due soon. Red (3% or more) is critical and requires an immediate brake fluid flush.
- Apply Pre-MOT Strategy: Test your fluid 4-6 weeks before your MOT is due. This « pre-MOT window » gives you ample time to book a brake fluid flush at a competitive price, avoiding the last-minute rush and premium charges of a repair needed on the day of the test.
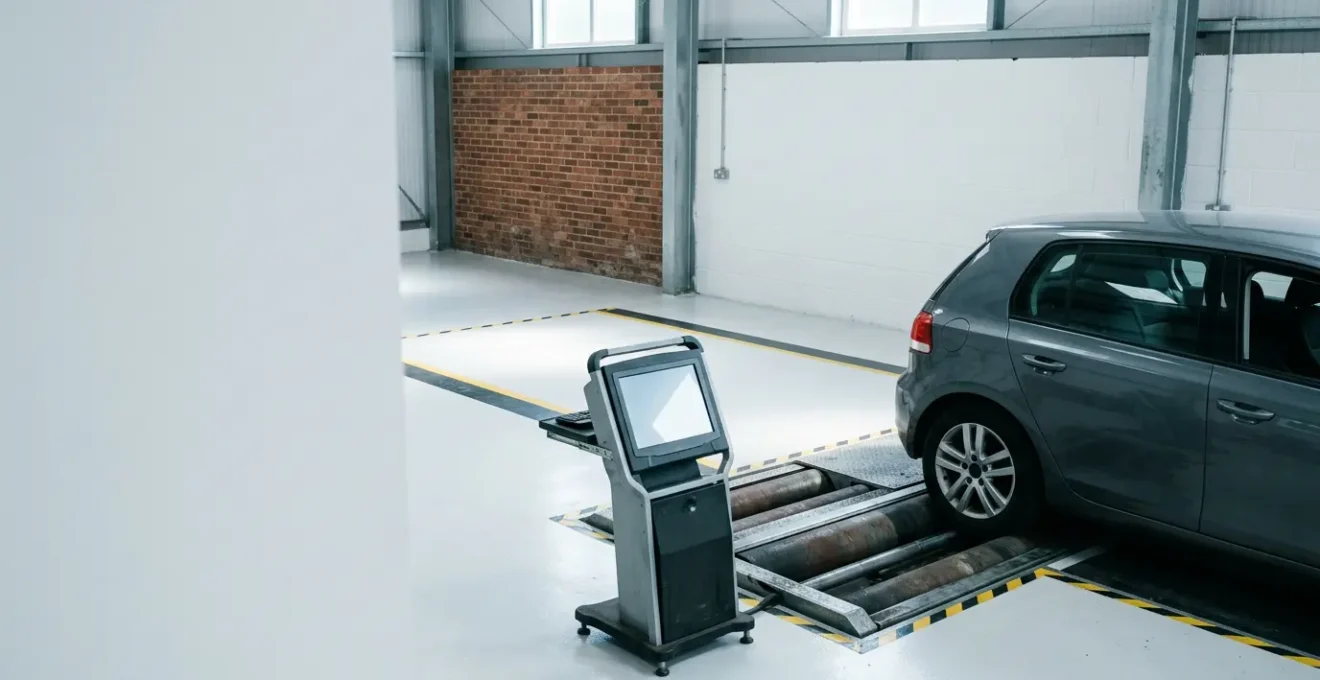
When to Book Your Service: The 6-Week Window That Maximises MOT Pass Rates?
The single most effective strategy for guaranteeing an MOT pass is to shift your mindset from « test day » to a « preparation window. » The common approach of booking an MOT and hoping for the best is a gamble. A far more intelligent method, as detailed in the Stress-Free MOT Strategy for UK drivers, is to leverage a strategic 6-week window before your certificate expires. This approach puts you, the owner, in complete control of time, cost, and quality of repairs, especially for critical systems like brakes.
The strategy is simple but powerful. UK law allows you to get an MOT test up to a month (minus a day) before your current one runs out, while still preserving the same renewal date. This rule is the foundation of the strategy. At 6 weeks before the expiry date, you book your car in for a full service or a dedicated pre-MOT inspection, not the MOT itself. This service acts as a diagnostic tool. A good technician will identify any issues that are current or borderline failures, such as brake pads approaching the 1.5mm limit, early signs of brake line corrosion, or a brake imbalance trending towards the 30% failure threshold.
With this diagnostic report in hand, you now have a crucial advantage: time. You have 2-3 weeks to act on the findings. You can source the necessary parts yourself and get competitive quotes for labour from multiple garages. You are no longer a « captive customer » facing a tight deadline, forced to accept the pricing and schedule of the MOT testing station. You can have the repairs completed at your convenience and at a fair price. Then, in the final weeks, you present the fully-prepared vehicle for its official MOT test, confident that it will sail through. This proactive approach transforms the MOT from a stressful ordeal into a simple, final validation of work already done.
The Tyre Wear Pattern That Reveals You Have Been Running 10 PSI Low for Months
An experienced MOT tester can diagnose problems with your braking and suspension systems just by looking at your tyres. The tyres are the final link in the chain that transfers braking force to the road, and their condition is a direct reflection of the entire system’s health. Uneven tyre wear is not just a tyre problem; it is a critical symptom of underlying issues with alignment, suspension, or inflation that have a profound impact on braking performance and safety. Ignoring these patterns is like ignoring the check engine light.
The most common and revealing pattern is wear on both outer shoulders of the tyre tread. This is the classic sign of chronic under-inflation. When a tyre is running 10 PSI or more below its recommended pressure, the sidewalls flex excessively, causing the centre of the tread to lift slightly away from the road surface. This forces the outer edges to bear the brunt of the vehicle’s weight and braking forces, causing them to wear out prematurely. This not only risks a tyre-related MOT failure (tread depth below 1.6mm) but also seriously compromises braking by causing the sidewall to deform under load, which can delay the response of the ABS system and increase stopping distances.
A comprehensive vehicle check must include reading the story told by your tyres. As this data from a common MOT failures analysis by the RAC shows, each wear pattern points to a specific mechanical fault that a tester will be looking for.
| Wear Pattern | Visual Description | Root Cause | Impact on Braking Performance | Related MOT Failure Risk |
|---|---|---|---|---|
| Wear on both outer shoulders | Tread depth significantly lower on outer edges than center | Under-inflation (typically 10+ PSI below recommended pressure) | Sidewall flex delays ABS response and increases stopping distances despite larger contact patch | Tread depth below 1.6mm legal minimum across central three-quarters |
| Wear in center tread only | Center tread worn while shoulders retain depth | Over-inflation (typically 10+ PSI above recommended pressure) | Reduced contact patch limits braking force transfer to road surface | Premature center wear reaching legal minimum while shoulders appear serviceable |
| Feathered or scalloped wear | Tread blocks worn at angles or in wave pattern | Worn suspension components (ball joints, bushings, shock absorbers) | Major cause of brake instability – vehicle ‘nose-dives’ excessively under braking, creating uneven strain on front pads and discs | Multiple failures: tyre wear + suspension defects + accelerated brake component wear |
| One-sided wear (inner or outer edge only) | Significant wear on one edge of tread | Wheel alignment issue (excessive camber or toe) | Vehicle pulls to one side during braking, mimicking symptoms of brake imbalance | Tread depth failure + potential suspension geometry failure |
Key Takeaways
- Systemic Imbalance: An MOT failure is often caused by a difference in brake force across an axle (>30%), not just worn parts. Always replace pads and discs in axle pairs.
- Hidden Corrosion and Wear: The inner brake disc face and inner pad often wear faster and corrode more severely. A visual check must include these hidden surfaces.
- Fluid is a Component: Brake fluid performance degrades due to moisture absorption. Test the moisture content annually; a level of 3% or more is a critical safety risk.
Why Do Some Brake Pads Last 25,000 Miles While Others Fail at 8,000?
It’s a question that frustrates many drivers: why did the last set of brake pads last for years, while the new set needed replacing in less than 12 months? The answer rarely lies solely with the quality of the pad itself. While premium ceramic pads will outperform budget organic ones, the biggest factor determining brake longevity is the quality of the installation and the overall condition of the braking system. A « cheap » brake job that skips crucial labour steps is the primary reason for premature failure.
The critical, often-skipped step is the thorough cleaning and lubrication of the caliper carrier and slide pins. Over time, these components become clogged with brake dust, rust, and old, hardened grease. If a technician simply forces new pads into a dirty carrier, the pads cannot move freely. One pad may become partially seized, doing most of the braking work, while the other barely engages. This creates massive brake imbalance and causes the overworked pad to wear out three to four times faster than it should. A proper brake service involves completely disassembling the caliper, cleaning all contact points with a wire brush, and applying fresh, high-temperature copper grease to ensure smooth, even operation.
Driving style and vehicle usage are also major factors. The trend towards lower annual mileage, with some data showing average annual mileages for private cars in the UK have dropped below 7,500 miles, has increased the risk of corrosion-based failures. Short, stop-start city journeys where the discs never reach optimal operating temperature promote the build-up of surface rust that eats away at the disc material. In contrast, regular motorway driving with occasional firm braking helps keep the friction surfaces clean. Ultimately, the lifespan of your brakes is an equation: it’s the quality of the components plus the condition of the system, divided by the demands of your driving style. Neglecting the system’s condition is the fastest way to the bottom of that equation.
Stop treating the MOT as a yearly gamble. The path to a consistent pass lies in adopting the systematic, diagnostic mindset of a technician. By focusing on systemic balance, hidden corrosion, and proactive maintenance within a strategic window, you take control of your vehicle’s safety and your own finances. Begin implementing these inspection techniques today to ensure your vehicle is not just road-legal, but fundamentally safe.